

This is the Myduino IoT Maker Kit, designed specifically for beginners and enthusiasts who want to dive into the world of IoT (Internet of Things). The kit includes a comprehensive selection of Raspberry Pi Pico W most popular and versatile electronic components, ideal for building smart projects.
Additionally, we provide detailed tutorials that feature project descriptions, step-by-step instructions, and source codes. Working through these projects gives you hands-on experience and a solid foundation in IoT concepts. With this kit, you’ll unlock the ability to interact with and control the physical world through smart devices and sensors.
Kit Contents


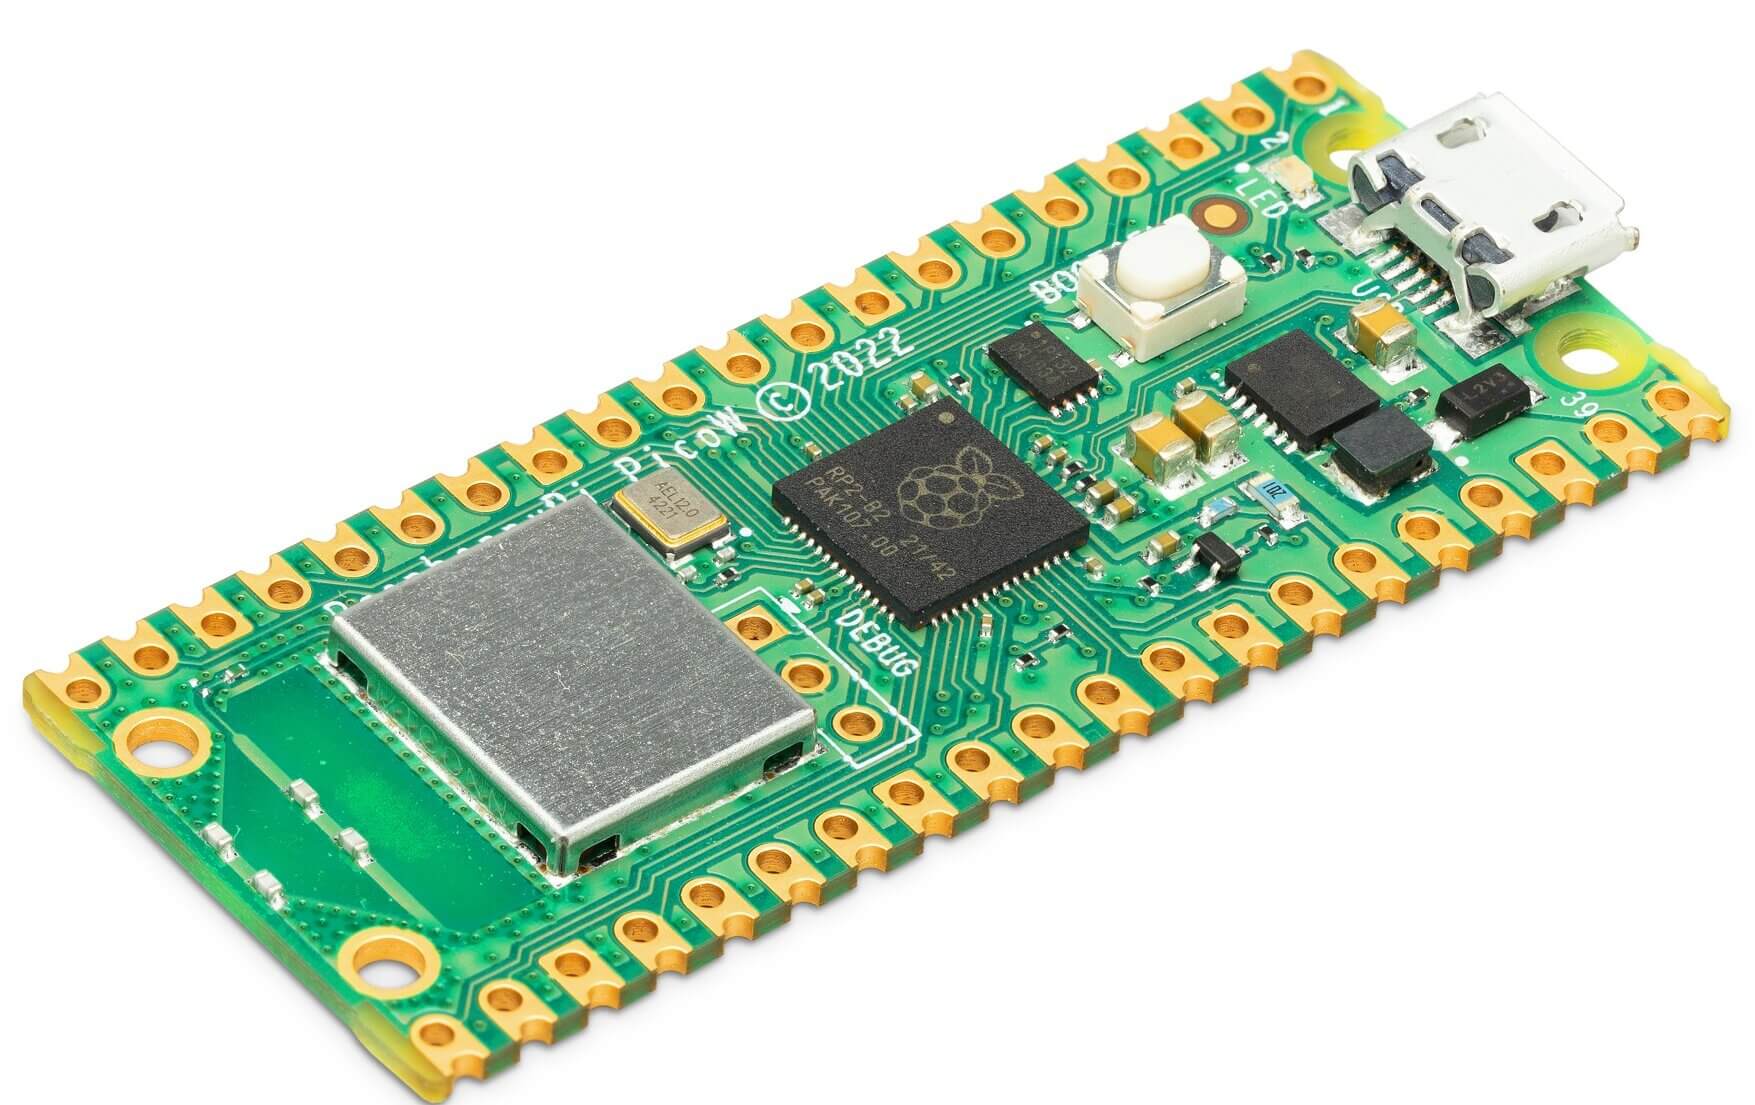
Introduction to Raspberry Pi Pico W
The Raspberry Pi Pico W brings wireless connectivity to the Raspberry Pi Pico. It’s built around our RP2040 microcontroller and CYW43439 WiFi chip.

Raspberry Pi Pico W is a new microcontroller board made by the popular Raspberry Pi single-board computer makers. The device has 2.4GHz 802.11 b/g/n wireless LAN support. It has an onboard antenna.
It has an onboard antenna. the unique chip of this device supports both station and access-point modes. Moreover, however, in the broadcast of this device, Full access to network functionality is available to both C and MicroPython developers.
Bluetooth is not enabled on Raspberry Pi Pico W. This is due to software limitations(SDK) and not hardware.
RP2040 chips and a power supply chip are available in 2MB of flash memory. it can support input voltages from 1.8–5.5V. Moreover, they provide 26 GPIO pins, three of which can function as analogue inputs, on 0.1”-pitch through-hole pads with castellated edges.
One of the most notable features of the Pico is its low price point. At just $6, the Pico is one of the most affordable microcontroller boards on the market. It is also one of the most miniature boards, measuring just 20mm x 45mm.
The Raspberry Pi Pico W is designed to be used in various applications. One of the most popular applications for the Pico is as a replacement for an Arduino board. The Pico is fully compatible with the Arduino IDE, making it easy for users to start programming the board.
Features of Raspberry Pi Pico W
- 21 mm × 51 mm form factor
- RP2040 microcontroller chip designed by Raspberry Pi in the UK
- Dual-core Arm Cortex-M0+ processor, flexible clock running up to 133 MHz
- 264kB on-chip SRAM
- 2MB on-board QSPI flash
- 2.4GHz 802.11n wireless LAN
- 26 multifunction GPIO pins, including 3 analog inputs
- 2 × UART, 2 × SPI controllers, 2 × I2C controllers, 16 × PWM channels
- 1 × USB 1.1 controller and PHY, with host and device support
- 8 × Programmable I/O (PIO) state machines for custom peripheral support
- Supported input power 1.8–5.5V DC
- Operating temperature -20°C to +70°C
- The castellated module allows soldering directly to carrier boards
- Drag-and-drop programming using mass storage over USB
- Low-power sleep and dormant modes
- Accurate on-chip clock
- Temperature sensor
- Accelerated integer and floating-point libraries on-chip
Raspberry Pi Pico W Pinout
Raspberry Pi Pico has several built-in peripherals, including 40 GPIO pins, 2 SPI buses, 2 I2C buses, 4 PWM channels, and 8 ADC channels. The board also has a programmable LED, a temperature sensor, and a boot mode button.

| Name | Description | Function |
|---|---|---|
| GP0-GP28 | General-purpose input/output pins | Act as either input or output and have no fixed purpose of their own |
| GND | 0 volts ground | GND pins around Pico W to make wiring easier. |
| RUN | Enables or diables your Pico | You can start and stop Pico W from another microcontroller. |
| GPxx_ADCx | General-purpose input/output or analogue input | Used as an analogue input as well as a digital input or output – but not both at the same time. |
| ADC_VREF | Analogue-to-digital converter (ADC) voltage reference | A special input pin sets a reference voltage for any analogue inputs. |
| AGND | Analogue-to-digital converter (ADC) 0 volts ground | A special ground connection for use with the ADC_VREF pin. |
| 3V3(O) | 3.3 volts power | A source of 3.3V power, the same voltage your Pico W runs at internally, generated from the VSYS input. |
| 3v3(E) | Enables or disables the power | Switch on or off the 3V3(O) power, can also switch your Pico W off. |
| VSYS | 2-5 volts of power | A pin is directly connected to your Pico’s internal power supply, which cannot be switched off without also switching Pico W off. |
| VBUS | 5 volts power | A source of 5 V power is taken from your Pico’s micro USB port and used to power hardware which needs more than 3.3 V. |
Programming & Installing MicroPython on Raspberry Pi Pico W
The Raspberry Pi Pico W can be programmed using C/C++ or MicroPython, among other languages. The Pico W is suitable for a wide range of applications and skill levels, and getting started is as simple as dragging and dropping a file. If you are developing in C, it is advisable to use a Linux-based system, such as a Raspberry Pi computer, as it makes downloading the SDK and writing C programs easier.

For programming the Raspberry Pi Pico W board, I recommend using MicroPython. MicroPython is a Python interpreter designed for microcontrollers and embedded systems. MicroPython’s syntax is quite similar to Python’s, so if you’ve worked with Python before, you’ll find working with MicroPython very straightforward.
However, before you can start using the Raspberry Pi Pico W, you must first install MicroPython on the board.
Push and hold the Pico W’s BOOTSEL button, then instantly connect the Pico W Board to your computer via a micro USB cable. Once the RPI-RP2 drive shows on your computer, release BOOTSEL.

Open the RPI-RP2 drive that appears in the Drives tab.

Visit the Raspberry Pi Pico W Official Documentation page from here: Raspberry Pi Datasheets.

Download the MicroPython UF2 file from the MicroPython tab.

Drag and drop the UF2 file onto the RPI-RP2 drive. The Raspberry Pi Pico W will reboot and will now run MicroPython.

Now you can start using the Raspberry Pi Pico W with MicroPython on Thonny IDE & make unlimited IoT projects.
Getting Started with Raspberry Pi Pico W using MicroPython
Now let us get started with Raspberry Pi Pico W using MicroPython on Thonny IDE. First you have to download Thonny from the https://thonny.org/

Connect the Raspberry Pi Pico W to your computer. Then from Thonny go to Tools > Options and click on the Interpreter tab. From the interpreter dropdown list, select MicroPython (Raspberry Pi Pico). The port dropdown menu can be left to automatically detect the Pico. Click Ok to close.

After a successful connection, the MicroPython version and Raspberry board will appear in the Python Shell. To test we can write a quick print function to say “Hello World”. Press Enter to run the code. You will get Hello World as a response.

You can also check the device information by following commands.

The directory can also be viewed using the following command.


Scanning WiFi Access Points
The Raspberry Pi Pico W has CYW43439 2.4-GHz Wi-Fi chip from Infineon. So the Board can connect to the WiFi network and all the features related to WiFi can be accessed as well.
Lets scan all the available Network Access Points using the Raspberry Pi Pico W working in a station Mode.
In the Thonny editor, paste the following code and save it with any name like main.py.

Now hit the run button to run the code.

The WiFi chip will scan all the available network and shows the list of all the network in Shell Window.
Connecting to the Internet (WLAN/WiFi Network)
Now let’s see how Raspberry Pi Pico W connects to the Wi-Fi network.
Create a new script by clicking the New button on Thonny IDE. Copy and paste the following code. Replace the WiFi credentials by changing the SSID and PASSWORD to your own.

Now Run current script. If the connection is successful, true will be printed.

Timeout Judgment & Showing Raspberry Pi Pico W IP Address
Considering some poor network conditions, let’s add some timeout judgment to the code and also print the IP Address of the network to which the Pico W get connected.
Create a new script by clicking the New button on Thonny IDE. Copy and paste the following code. Replace the WiFi credentials.

Now run the script.

The Thonny Shell will display the IP Address of the Pico W.
wlan.status()function: Returns the current status of the wireless connectionwlan.ifconfig()function: Obtains IP addresses, subnet masks, gateways, and DNS servers. This method will return a 4-tuple containing the above information when called directly. In this case, we only print the IP address.
For more information about the WiFi commands, refer to the class WLAN MicroPython documentation.
Storing WiFi Credentials on Secret File & Simplify WiFi Connection
When you share your Pico W project, you should not want others to see your Wi-Fi password or API key. For good security, we can create a secrets.py file to store your private information.
Considering that each of our next projects will require a network connection, why don’t we create a new do_connect.py file and write the relevant functions into it for reuse, which can greatly streamline the code of complex projects.
secrets.py
Copy the following code into a new script file on Thonny. Note to change SSID and PASSWORD to yours. Set the file name to secrets.py

do_connect.py
Copy the following code into a new script file, and save it to Raspberry Pi Pico as do_connect.py.

main.py
Calling the above script in other scripts by the following will allow the Raspberry Pi Pico W to connect to the network.

After running all the 3 scripts, the Pico W will connect to the WiFi Network.

Project Details
Project 1: IoT Controlled Relay using Raspberry Pi Pico W WiFi
Introduction
The IoT Controlled Relay using Raspberry Pi Pico W WiFi project demonstrates how to remotely control high-power devices through a web server hosted on the Raspberry Pi Pico W. By integrating a relay module with the Pico W’s built-in WiFi capabilities, users can manage appliances such as water pumps, air conditioners, and heaters over a local network.
The project provides detailed instructions on setting up the hardware, including the necessary components like the Raspberry Pi Pico W, a 1-channel relay, and an AC bulb. It also guides users through programming the Pico W using MicroPython via the Thonny IDE, enabling the creation of a web interface accessible from any device on the same network. This setup allows for convenient and cost-effective remote control of household appliances, enhancing home automation efforts.

Parts Required
- Raspberry Pi Pico W
- Jumper wires
- Breadboard
- 5V LED Traffic Light Module
- 1 Channel Low-Level Trigger Relay Module 5V
Resources
- IoT Controlled Relay using Raspberry Pi Pico W WiFi, by how2electronics
Project 2: Send Sensor Data to Thingspeak with Raspberry Pi Pico W
Introduction
The Send Sensor Data to ThingSpeak with Raspberry Pi Pico W project demonstrates how to transmit environmental data to the ThingSpeak cloud platform using a Raspberry Pi Pico W and a DHT11 temperature and humidity sensor. This tutorial provides detailed instructions on hardware setup, including connecting the DHT11 sensor to the Pico W, and software configuration using MicroPython. By following this guide, users can monitor real-time environmental data remotely through the ThingSpeak dashboard, offering a practical introduction to IoT data logging and cloud-based monitoring solutions.

Parts Required
Resources
- Send Sensor Data to Thingspeak with Raspberry Pi Pico W, by how2electronics
Project 3: Temperature & Humidity Reading Pico W + Telegram Bot
Introduction
The Temperature & Humidity Reading Pico W + Telegram Bot project demonstrates how to monitor environmental conditions using a Raspberry Pi Pico W and a DHT11 sensor, with real-time data sent to a Telegram bot for remote monitoring. Additionally, users can control a device in the room via the Telegram app, and the system displays readings on a 16×2 LCD. This project offers a practical introduction to IoT applications, combining sensor data acquisition, cloud-based communication, and device control through a user-friendly interface

Parts Required
- Raspberry Pi Pico W
- Jumper wires
- Breadboard
- DHT11 Temperature and Humidity Sensor
- I2C 16×2 LCD Blue/Green Backlight
Resources
- Temperature & Humidity Reading | Pico W + Telegram Bot, by Diy Projects lab
Project 4: IoT-Based Door Security Alarm System Using Pico W and Telegram
Introduction
The IoT-Based Door Security Alarm System Using Pico W and Telegram project offers a comprehensive guide to enhancing home security through modern technology. By integrating a Raspberry Pi Pico W with an infrared (IR) sensor, this system detects movement at your door and promptly sends alarm notifications to your device via the Telegram messaging app. The tutorial provides detailed instructions on hardware connections, including linking the IR sensor to the Pico W, and software setup using CircuitPython and the Thonny editor. This project serves as an excellent introduction to IoT applications, demonstrating how to combine hardware and software to create a responsive and reliable home security solution

Parts Required
Resources
- IoT-Based Door Security Alarm System Using Pico W and Telegram, by my.cytron.io
Project 5: IoT Soil Moisture Monitor with Raspberry Pi Pico W & Blynk
Introduction
The IoT Soil Moisture Monitor with Raspberry Pi Pico W & Blynk project offers a comprehensive guide to remotely monitoring soil moisture levels using the Raspberry Pi Pico W microcontroller and the Blynk IoT platform. By interfacing a capacitive soil moisture sensor with the Pico W, users can transmit real-time moisture data over Wi-Fi to the Blynk application, enabling convenient monitoring via smartphones or computers. This setup is particularly beneficial for agriculture, allowing for efficient irrigation management and promoting optimal plant health.

Parts Required
Resources
- IoT Soil Moisture Monitor with Raspberry Pi Pico W & Blynk, by how2electronics
- How To Use Raspberry Pi Pico With Moisture Sensor, by Diy Projects lab
Project 6: Servo Control With Raspberry Pi Pico W and Blynk App
Introduction
The Servo Control With Raspberry Pi Pico W and Blynk App project provides a comprehensive guide to remotely controlling a servo motor using the Raspberry Pi Pico W microcontroller and the Blynk IoT platform. This tutorial offers detailed instructions on hardware setup, including connecting the servo motor to the Pico W, and software configuration using MicroPython. By following this guide, users can create a responsive system that allows for precise servo motor control via the Blynk mobile application, enhancing their understanding of IoT applications and remote device management.

Parts Required
Resources
- Servo Control With Raspberry Pi Pico W and Blynk App, by Instructables
Project 7: A Simple Fire Alarm With Raspberry Pi Pico
Introduction
The Simple Fire Alarm with Raspberry Pi Pico project is a beginner-friendly guide to building a basic fire detection system using the Raspberry Pi Pico microcontroller. This system utilizes an flame sensor to detect the presence of fire and triggers an audible alarm through a connected buzzer. By continuously monitoring the sensor, the project provides an effective early warning system for potential fire hazards. With easy-to-follow hardware connections and Python-based programming, this project serves as an excellent introduction to IoT-based safety systems. It also offers opportunities for future enhancements, such as remote notifications via Wi-Fi, making it a practical and educational project for DIY enthusiasts.

Parts Required
Parts Required
- A Simple Fire Alarm With Raspberry Pi Pico, by bekirbilge
Buy From
- Myduino IoT Maker Kit Raspberry Pi Pico W from Myduino.com


